
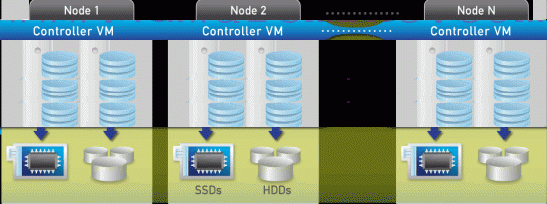
In the Nutanix cluster base brick of each of the Nutanix cluster is Nutanix node. Each and every node in the cluster having memory, CPU, RAM and storage . Each node in the cluster runs standard hypervisor such as:
- Nutanix AHV
- VMware vSphere
- Microsoft Hyper-V
Each cluster node runs controller VM enabling the pulling of local storage from all nodes in the Nutanix cluster.
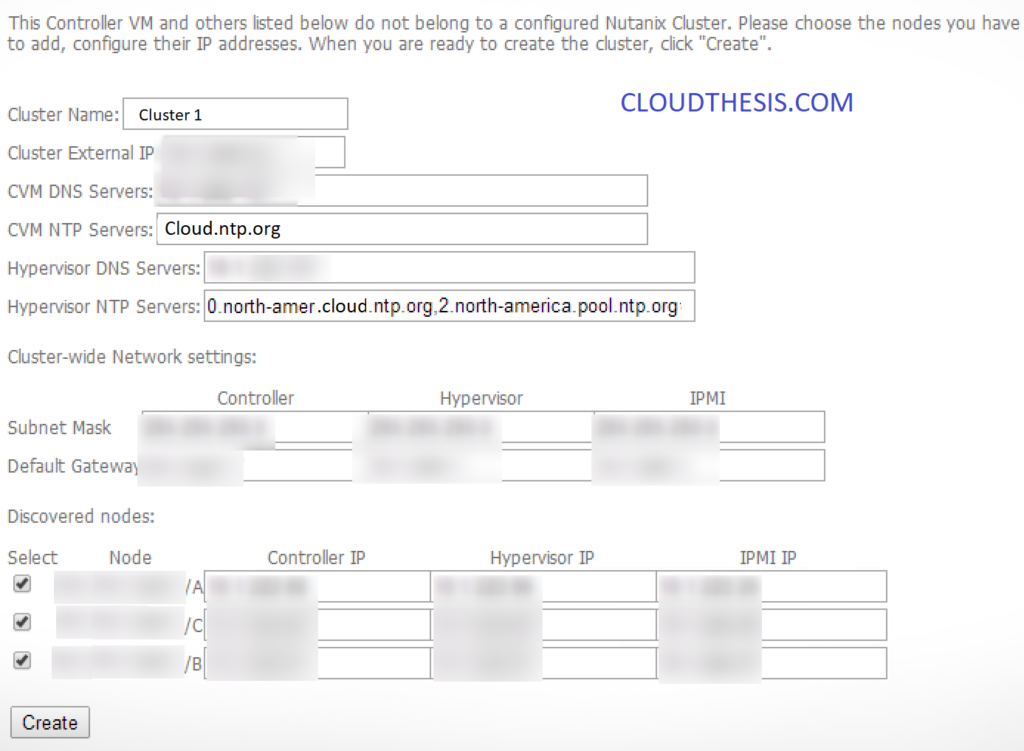
Create Nutanix cluster – WEB UI
Web UI Open web browser and type http://CVM_IP_ADDRESS:2100/cluster_init.html On the bottom of the age you should see all nodes which are not a part of any cluster. Mark them all. Provide all required information and click on Create.
To make sure that cluster is in a good state, lg in to one of the CVMs and run command: cluster status . As an output you should see status of Nutanix applications on all CVM in the NOS cluster. All of them must be in UP status. If you see it differently, wait few more minutes and type cluster status command again. If it didn’t help, stop cluster – cluster stop – command, wait few minutes, check cluster status – cluster status – all services on all CVM should be in DOWN status and type cluster start command again. This should fix a problem.
nutanix@NTNX-14SM1447184-A-CVM::~$ cluster status
2014-07-29 10:20:28 INFO cluster:1691 Executing action status on SVMs
The state of the cluster: start
Lockdown mode: Enabled
CVM: Up
Zeus UP [8475, 8488, 8489, 8490, 8498, 8511]
Scavenger UP [8717, 8734, 8735, 8763]
ConnectionSplicer UP [8784, 8799]
Hyperint UP [8805, 8817, 8818, 8819, 8825, 8829]
Medusa UP [8959, 8973, 8974, 8989, 9154]
DynamicRingChanger UP [9829, 9841, 9842, 9862]
Pithos UP [9844, 9857, 9858, 9885]
Stargate UP [9861, 9882]
Cerebro UP [10211, 10223, 10224, 10252]
Chronos UP [10226, 10238, 10239, 10245]
Curator UP [10312, 10332, 10333, 10450]
Prism UP [10342, 10355, 10356, 10392]
AlertManager UP [10358, 10370, 10371, 10442]
Arithmos UP [10373, 10385, 10386, 10476]
StatsAggregator UP [10389, 10409, 10410, 10472]
SysStatCollector UP [10411, 10431, 10432, 10526]
CVM: Up, ZeusLeader
Zeus UP [8443, 8455, 8456, 8459, 8465, 8479]
Scavenger UP [8687, 8705, 8706, 8728]
ConnectionSplicer UP [8750, 8765]
Hyperint UP [8773, 8794, 8795, 8802, 8808, 8812]
Medusa UP [8924, 8938, 8939, 8955, 9104]
DynamicRingChanger UP [9769, 9781, 9782, 9802]
Pithos UP [9784, 9797, 9798, 9825]
Stargate UP [9801, 9822]
Cerebro UP [10103, 10118, 10119, 10149]
Chronos UP [10121, 10135, 10136, 10142]
Curator UP [10159, 10182, 10183, 10288]
Prism UP [10187, 10206, 10207, 10244, 11055, 11065]
AlertManager UP [10210, 10222, 10223, 10278, 20037]
Arithmos UP [10225, 10237, 10238, 10308]
StatsAggregator UP [10358, 10372, 10373, 10396, 10413, 10417]
SysStatCollector UP [10370, 10385, 10386, 10441]
CVM: Up
Zeus UP [8480, 8492, 8493, 8498, 8503, 8516]
Scavenger UP [8764, 8781, 8782, 8803]
ConnectionSplicer UP [8827, 8842]
Hyperint UP [8848, 8860, 8861, 8862, 8868, 8872]
Medusa UP [8952, 8970, 8971, 8986, 9126]
DynamicRingChanger UP [9694, 9707, 9708, 9732]
Pithos UP [9710, 9723, 9724, 9751]
Stargate UP [9727, 9748]
Cerebro UP [10032, 10044, 10045, 10073]
Chronos UP [10047, 10059, 10060, 10066]
Curator UP [10121, 10142, 10143, 10242]
Prism UP [10152, 10164, 10165, 10201]
AlertManager UP [10167, 10179, 10180, 10243]
Arithmos UP [10182, 10194, 10195, 10292]
StatsAggregator UP [10197, 10215, 10216, 10277]
SysStatCollector UP [10219, 10239, 10240, 10351]
2014-10-29 03:52:31 INFO cluster:1746 Success!
nutanix@NTNX-14SM1447184-A-CVM::~$
Create Nutanix cluster – manually
If you prefer to use command line – you can create Nutanix cluster as well.
Log in to one of the CVM controllers over ssh and type: cluster -s cvm_ip_address create
| 1 | cluster -s cvm_ip_address create |
Replace cvm_ip_addrs by comma separated IP from all CVM
nutanix@NTNX-14SM1447184-A-CVM::~$ cluster -s IP,IP,IP create
2014-08-26 06:48:17 INFO cluster:1611 Executing action create on SVMs
2014-08-26 06:48:17 INFO cluster:606 Discovered node:
ip:
rackable_unit_serial: 14SM1447184
node_position: A
node_uuid: 3f5553cb-4479-46a0-8943-32495b08908e
2014-08-26 06:48:17 INFO cluster:606 Discovered node:
ip:
rackable_unit_serial: 14SM1447184
node_position: B
node_uuid: 81833c61-f062-4d5d-924f-3d4df75ad787
2014-08-26 06:48:17 INFO cluster:606 Discovered node:
ip:
rackable_unit_serial: 14SM15050017
.
.
The state of the cluster: start
.
.
2014-08-26 06:49:04 INFO cluster:1673 Success!
Nutanix cluster will start automatically after successful creation. Verify cluster status by cluster status command
cluster status
Create Nutanix cluster – manually – set cluster parameters
As you probably noticed already some differences between Web UI and command line. Now we have to supply missing parameters through command line.
Nutanix cluster name ncli cluster edit-params new-name=cluster_name
| 1 | ncli cluster edit-params new-name=cluster_name |
Add DNS servers ncli cluster add-to-name-servers servers=<var class=”keyword varname”>dns_server</var>
| 1 | ncli cluster add-to-name-servers servers=<var class=”keyword varname”>dns_server</var> |
DNS server comma separated
Configure NTP servers ncli cluster add-to-ntp-servers servers=”ntp_server”
| 1 | ncli cluster add-to-ntp-servers servers=”ntp_server” |
NTP server IP addresses comma separated
Create cluster external IP address ncli cluster set-external-ip-address external-ip-address=”cluster_ip_address”
| 1 | ncli cluster set-external-ip-address external-ip-address=”cluster_ip_address” |
This parameter is mandatory for Hyper-V deployment and optional for vSphere and Nutanix AHV
If you run Hyper-V as hypervisor make sure that external IP address has its entry in DNS servers.
Thanks hope you like it.
Rajiv Pandey.