
what is a vmware workload domain ?
Workload Domains. VMware Cloud Foundation 2.2. Last Updated 11/13/2017 0. A workload domain is a policy based resource container with specific availability and performance attributes that combines compute (vSphere), storage (vSAN) and networking (NSX) into a single consumable entity .(By Vmware )
what is VMware Cloud Foundation ?

VMware Cloud Foundation makes it easy to deploy and run a hybrid cloud. VMware Cloud Foundation provides integrated cloud infrastructure (compute, storage, networking, and security) and cloud management services to run enterprise applications in both private and public environments. (By Vmware )
(VCF) workloads generally are deployed in one or more particular virtual infrastructure (VI) workload domains. In between VCF deployment the management workload domain (MWLD) is created with minimum four hosts. The WLD contains among other components the management vCenter and the SDDC manager.
SDDC Manager, Commission hosts :

Now the hosts will prepared just like the VCF deployment. It will includes ESXi version, hardware configuration and network settings .
SDDC Manager, Commission hosts, Checklist :

Now click on Proceed , and the details of the hosts to be provided. Select Add new for manually or perform a bulk commission by preparing and uploading a JSON file.
SDDC Manager, Commission hosts, host addition :

JSON template example below :
{
    "hostsSpec": [
        {
            "hostfqdn": "FQDN name here",
            "username": "User Name here",
            "storageType": "VSAN or NFS",
            "password": "Password here",
            "networkPoolName": "Network Pool Name here"
        },
        {
            "hostfqdn": "FQDN name here",
            "username": "User Name here",
            "storageType": "VSAN or NFS",
            "password": "Password here",
            "networkPoolName": "Network Pool Name here"
        }
    ]
}
Required host’s details , storage type and network pool to be used. then also license keys are required. Total three license keys are required vSphere, vSAN and NSX should be entered in the “Administration/License” screen of the SDDC manager.
Network pools are created in the “Administration/Network settings” screen. In this case VLAN-IDs and subnet for vMotion and vSAN separate from the default pool used .
SDDC Manager, Network pools :

Then you will get the “Usassigned hosts” tab .
SDDC Manager, Inventory/Hosts:

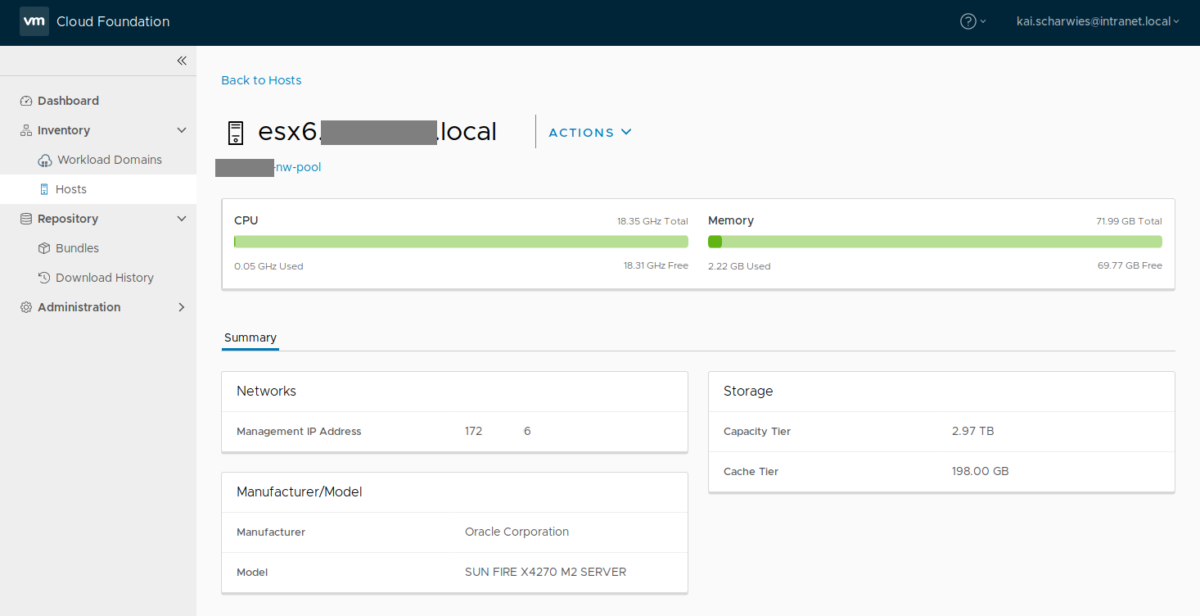
select and click the host and you will get the details,like.. manufacturer, model and storage capacity .
SDDC Manager, Inventory/Hosts, Host details :
Now create a new WLD by using “+ workload domain” button from the inventory.
SDDC Manager, Workload Domains :

Then select the storage from next dialog box.
SDDC Manager, Workload Domains:

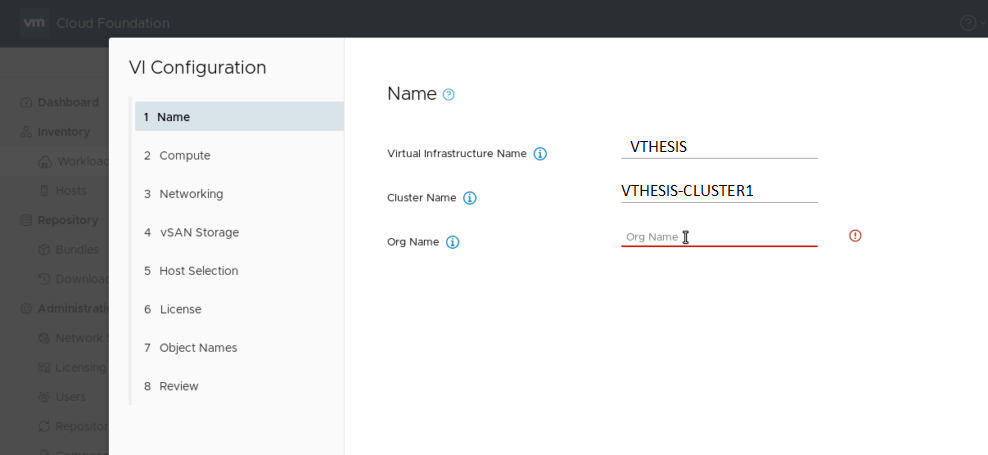
Then enter the Virtual Infrastructure configuration wizard enter names for the WLD, the first cluster and the organization the domain is intended for.
SDDC Manager, Workload Domains, Add Virtual Infrastructure WLD in Step 1
Now type free IP address from the management subnet. FQDN configured in your DNS servers and root password for the WLD’s vCenter.
SDDC Manager, Workload Domains, Add Virtual Infrastructure WLD, Step 2

In both cases FQDNs, IP addresses and root/admin password for the NSX managers must be entered, as well as a VLAN ID used for the overlay transport (VXLAN for NSX-V; Geneve for NSX-T).
SDDC Manager, Workload Domains, Add Virtual Infrastructure WLD, Step 3

If you selected vSAN as primary storage provider in the first step you need to enter the PFTT (primary failure to tolerate) parameter in step four. “One failure to tolerate” means each data set is replicated once, similar to RAID 1. This means that any of the three required hosts can fail at any point in time without data loss.
If you have at least five hosts you can select PFTT=2, which means data is replicated twice, so two hosts may fail simultaneously. This is only the default setting however. PFTT can be set for each object via storage profiles later on, too.
SDDC Manager, Workload Domains, Add Virtual Infrastructure WLD, Step 4 :

Now select the hosts which shall be used for initial WLD creation.
SDDC Manager, Workload Domains, Add Virtual Infrastructure WLD, Step 5:

In the License step select the license keys entered before from the drop down menus. Each license should provide enough capacity for each product and not be expired.
SDDC Manager, Workload Domains, Add Virtual Infrastructure WLD, Step 6

Now you can see the last two screens show a review of all entered parameters and a preview of the component names which will be created.
SDDC Manager, Workload Domains, Add Virtual Infrastructure WLD, Step 7

SDDC Manager, Workload Domains, Add Virtual Infrastructure WLD, Step 8

When it’s finish you can be track in the Tasks view from the SDDC manager. click on the task all of its subtasks and their status are shown below.
SDDC Manager, Workload Domains, Add Virtual Infrastructure WLD, Subtasks 1

SDDC Manager, Workload Domains, Add Virtual Infrastructure WLD, Subtasks 2 :

After some time the WLD creation tasks should succeed.
SDDC Manager, Workload Domains, Creating Virtual Infrastructure WLD succeeded :

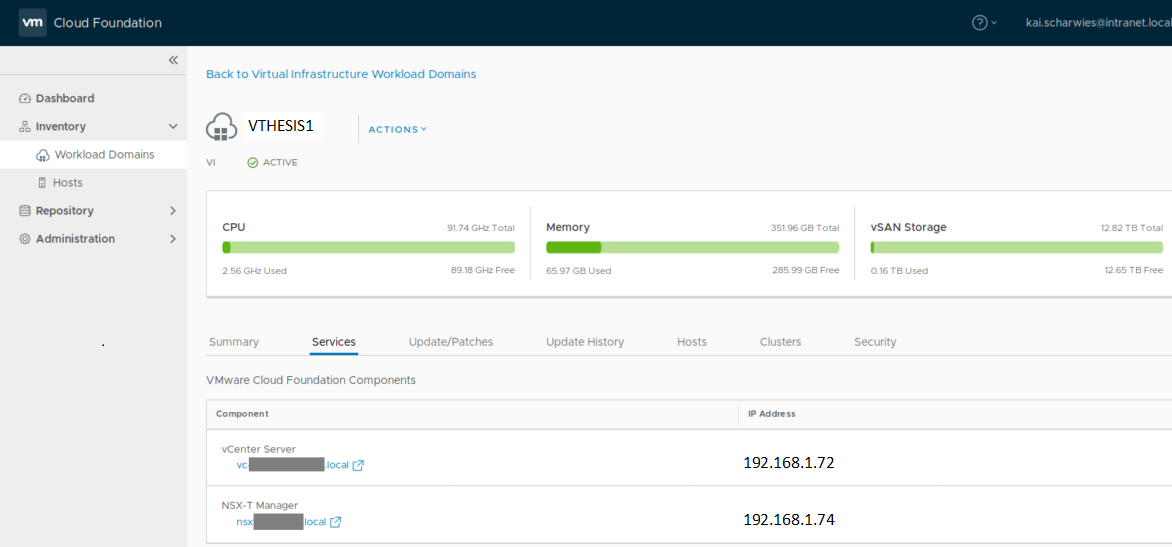
Now go to the overview under the “Inventory/Workload Domains” to check the status. The “Services” tab features links to the vCenter and the NSX-T manager GUIs.
SDDC Manager, Workload Domains, Details of WLD :
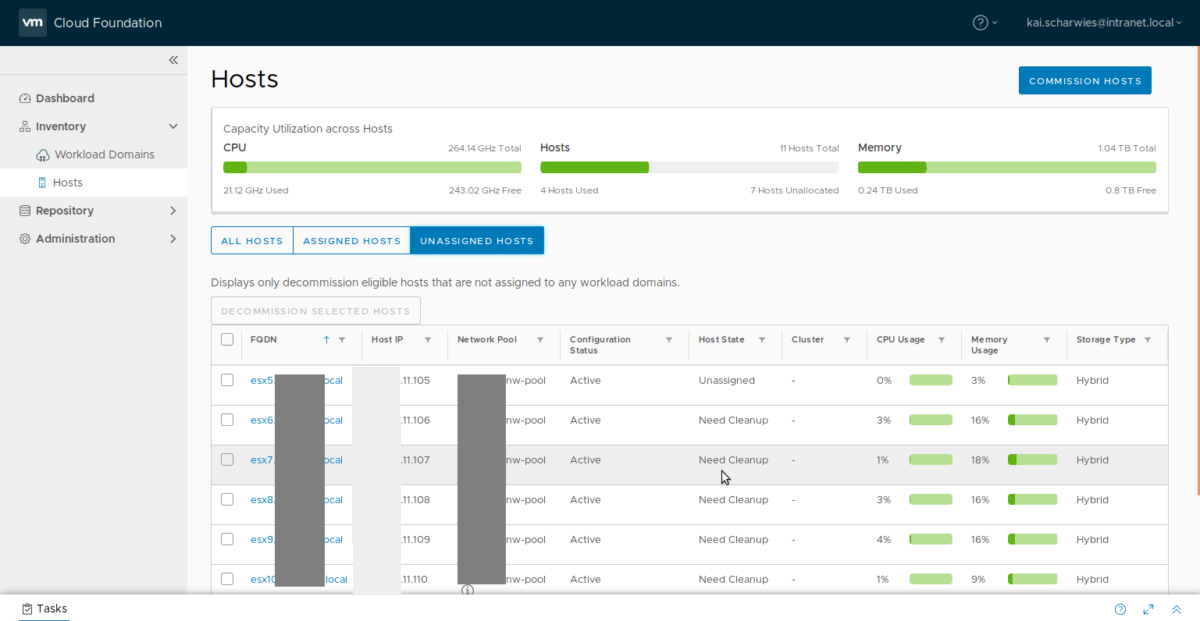
When host is removed from a workload domain or the entire WLD is deleted the hosts are found under the tab “Unassigned hosts” again, but their state shows “Need Cleanup” .
SDDC Manager, Inventory/Hosts, Decommissioning :
Now select the checkbox on the left of each host needing cleanup and click on the button “Decommission selected hosts”.
Now login to the SDDC manager by using SSH also prepare a JSON file containing the hosts and their management credentials.
[
   {
     "host1.local":
       {
         "root_user": "root",
         "root_password": "Vthesis@007"
       }
   },
   {
     "host2.local":
       {
         "root_user": "root",
         "root_password": "Vthesis@007"
       }
   }
 ]
Run the below commands found in the VCF documentation to commence the cleanup.
su
cd /opt/vmware/sddc-support
./sos --cleanup-decommissioned-host /tmp/dirty_hosts.json
SDDC Manager, Host cleanup script :

Afterwards however there is still the task of the network cleanup, which requires access to Direct Console User Interface (DCUI).
If the network cleanup is not performed you will be presented with errors as shown below when trying to re-commission the hosts.
SDDC Manager, Host addition of partly cleaned up hosts, Error 1 :

SDDC Manager, Host addition of partly cleaned up hosts, Error 2 :

In ESXi management GUI you will see the left over distributed virtual switch and its port groups from the previous WLD.

Now perform the network cleanup from DCUI with root user and then select “Network Restore Options” .

Now select the “Restore Network Settings” option which resets any network settings and devices to the defaults.

Network Restore Settings, Done

Thanks hope you like it.
Rajiv Pandey.