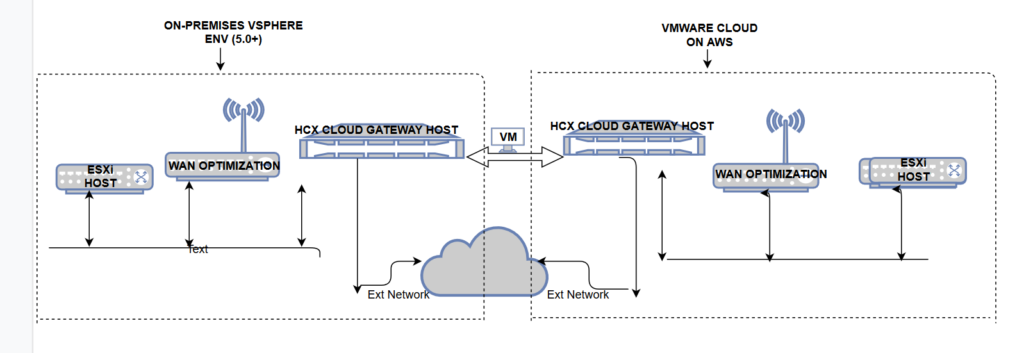
What is HCX ?
VMware Hybrid Cloud Extension (HCX) is probably one of the coolest VMware products that many people still don’t know about. … In a nutshell, VMware HCX is a SaaS offering that combines a set of network features that provide what is referred to as “Infrastructure Hybridity”.

Step 1 – First you have get the access to HCX Cloud (https://cloud.vmware.com/vmware-hcx) then select the specific VMWonAWS SDDC that you wish to enable HCX. It will take a few minutes while a new HCX Manager is being deployed within your SDDC, which can monitor the progress using the vSphere H5 Client.

Step 2 – Once the deployment has completed, now you see an “Open HCX” option. Then click on that to connect to your HCX Cloud instance. then login using the same credentials (which received on mail ) .

Step 3 – Next, we need to deploy an onPrem HCX Manager within your environment. You can download the OVA by clicking on the Administration tab and under System Updates, you will find a direct download or link as highlighted in the screenshot below. I found that the link was not clickable immediately and it took a few second before it was enabled.

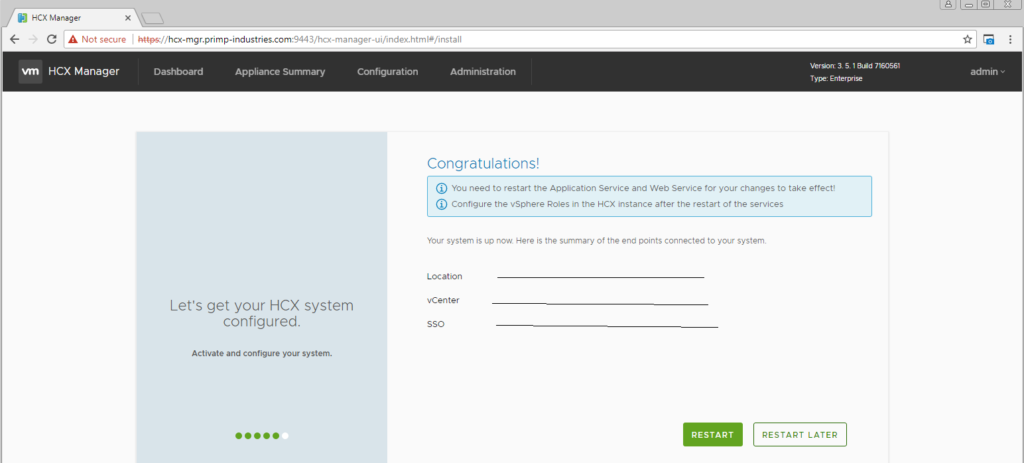
Step 4 – Now you have to import HCX Manager OVA (by using vSphere Web Client or OVFTool, do not use H5 ) in your vCenter Server environment that you wish to enable HCX migrations from and power on the VM after completing the OVF property requirements. You will need to configure it by opening a browser to following URL: https://[HCX-Manager]:9443. Once onPrem HCX Manager has has fully booted up, You will login with username admin and password you had set earlier in the OVF properties.

Step 5 -Now you will need to activate it with a different key which you should have also been provided via email before you can configure your onPrem HCX Manager. Follow the wizard to provide your vCenter Server, NSX (if you have that deployed) and SSO configuration and if everything was successful, you should see the following page below asking you to restart the application for the changes to take effect. Go ahead and click on restart and wait for the process to finish.

Step 6 – You should be re-directed to the Dashboard view where you can get a high level view of your onPrem HCX configuration once the restart completes . two more main configurations that we need to setup before we can proceed in pairing our onPrem HCX Manager with our HCX Manager Cloud instance.

Step 7 – The first it configuring who can access the HCX pairing between onPrem and VMWonAWS, deployment and setup of HCX Cloud Gateway as well as performing VM migration, network extensions and DR operations. Here is where you would add in your specific AD User/Group(s) for the two specific roles.

Step 8 – The last configuration is importing the SSL Certificate from our HCX Manager Cloud instance to establish a trust between the two HCX Managers. Simply select URL and provide the IP Address of your HCX Manager Cloud instance (e.g. https://[HCX-Manager-Cloud-Instance-IP]) and then click Apply.Also At this point, we are done configuring our onPrem HCX Manager and we can logout of the interface.

Step 9 – Now you have to login your vCenter Server using the vSphere Web (Flex) Client and you should now see a new HCX vSphere Web Client plugin on the left hand side. Go ahead and open that and you should your onPrem HCX Manager that we had just finished configuring. Next, we will pair this with our HCX Cloud instance running on VMWonAWS by clicking on the “New Site Parings” option

Step 10 – Now, we have to specify what HCX Services to enable. For both Live Migration and Replication Migration, you will need to select the HCX Interconnect Service which deploys the HCX Cloud Gateway which will require access to both the vMotion and VR Networks that your ESXi hosts sits on. If you would like to enable compression/de-dupe capabilities, go ahead and also select the HCX Optimization Service which will results in an additional virtual appliance to be deployed.

After deployment finishes, you should now see a new icon denoting the VMWonAWS location (US West or East) within the UI.

If you login to your VMWonAWS vCenter Server, you will also notice an equivalent set of HCX VMs that were also deployed on VMWonAWS automatically for you by the HCX Service without requiring any additional configuration or user interaction.

Before initiating a migration or consuming HCX Services, you can head over to the Interconnect tab and verify that both HCX VMs are up and running and that the tunnel between the onPrem HCX Gateway and VMWonAWS HCX Gateway can communicate with each other.

Now click on the Migration tab. Here you will find a list of all your onPrem VMs and you have a number of configurable options to apply on either a global level or on a per individual VM basis which is quite nice.
Thanks hope you like it.
Rajiv Pandey.