Creating Groups in Azure Active Directory for Access Management
Azure Active Directory (Azure AD) groups are used to efficiently manage access to shared resources for multiple users. Instead of assigning permissions individually, administrators can grant access to a group, and all its members inherit those permissions.
For example, a DevOps group can be created to provide access to logs across specific resources, resource groups, or even entire subscriptions. This approach simplifies access control and ensures consistency in permission management.
A Security Group in Azure AD can include:
- Members: Users, devices, other groups, and service principals
- Owners: Users and service principals
Steps to Create a Group via Azure Portal
- Sign in to the Azure Portal using a Global Administrator account.
- Search for and select Azure Active Directory (Microsoft Entra ID).
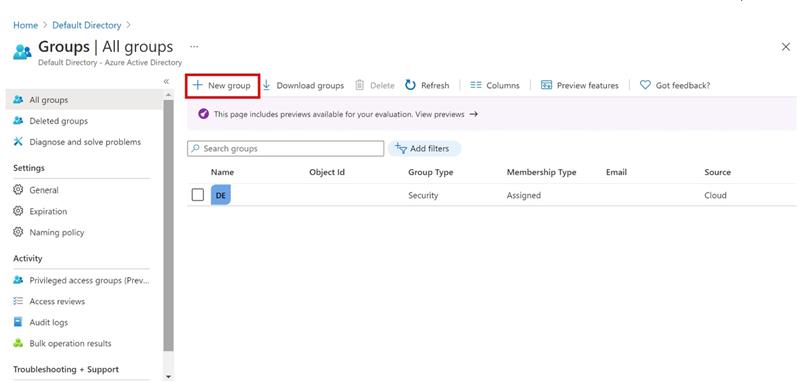
- In the left pane, under Manage, select Groups.
- Click on New Group.
- Configure the required group settings (Group type, Name, Members, etc.) and create the group.
This method enables centralized and scalable access management within Azure environments.
Kindly fill all mandatory fields within the new Group blade for successful setup.

Procedure to Create and Manage a Group
- Select a Predefined Group Type
Choose the appropriate group type based on your requirement (e.g., Security, Microsoft 365, Distribution, etc.). - Enter the Group Name
- Provide a unique and meaningful name for the group.
- Ensure the name follows your organization’s naming standards.
- The system will automatically validate the name to check if it already exists.
- If a duplicate is detected, you will be prompted to enter a different name.
- Provide a Group Description (Optional)
- Add a brief description to define the purpose of the group.
- This helps administrators and users understand the group’s functionality and usage.
- Create the Group
- Click on Create to provision the group.
- Once created, the group becomes available for member management.
- Add Members to the Group
- Navigate to the Members section within the group page.
- Click on Add Members (or similar option depending on the portal).
- Use the Search functionality on the Select Members page to locate users, devices, or other groups.
- Select the required members and confirm the addition.
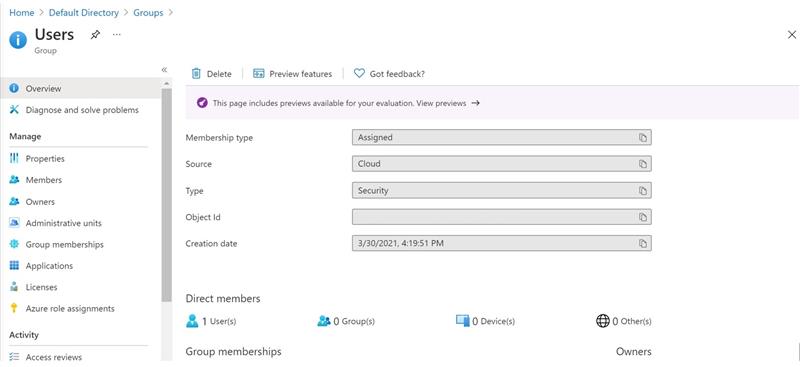
Outcome
The group is successfully created and configured, with members assigned as per requirement, making it ready for access control or resource management.
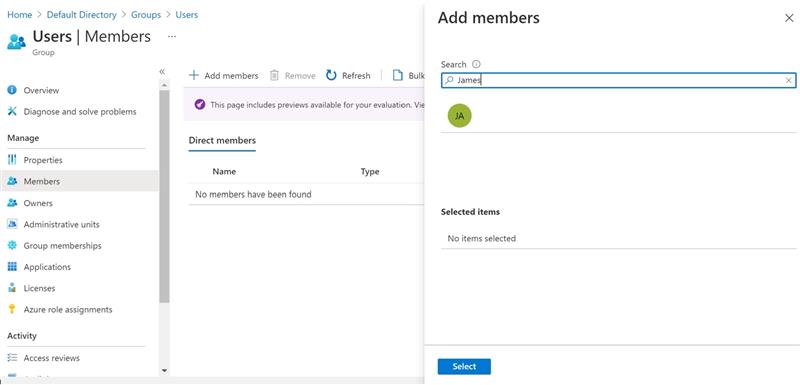
Once you have finished adding members, click Select. The Group Overview page will refresh to display the updated member count for the group.
For more information on group types, see Group and membership types
Managing Access via Azure AD Groups
Azure Active Directory (Azure AD) enables efficient access management to organizational resources by allowing permissions to be assigned either to individual users or to entire groups. Using Azure AD groups simplifies administration by allowing resource owners or directory administrators to assign a predefined set of permissions to all members of a group, eliminating the need to grant access individually.
Additionally, the resource owner or Azure AD administrator can delegate group membership management to other users, such as department managers or Helpdesk administrators. This delegation allows designated personnel to add or remove members from the group as required, ensuring flexibility and streamlined operations.
When an Azure AD group is assigned to a resource, all members of the group automatically inherit the assigned permissions. Group membership can be managed by both the group owner and the resource owner, enabling either party to maintain and update the member list as needed.
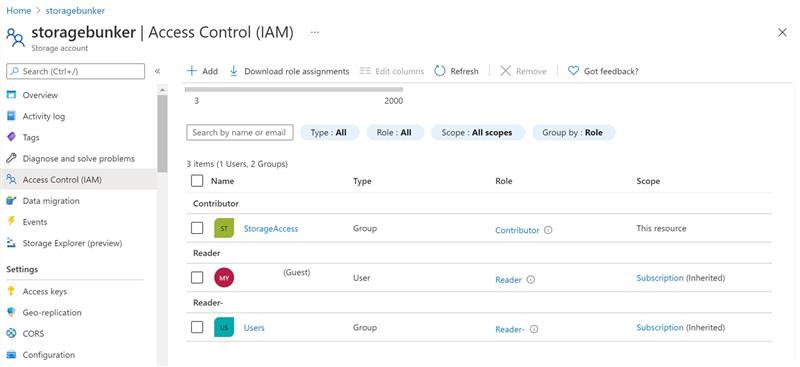
Example:
In the example shown below, the Storage Access group is assigned Contributor access to a specific storage account. This means all members of the group automatically receive contributor-level permissions for that resource. The detailed configuration process is covered in the next section.
RBAC in Azure Resources
Prerequisites
To assign Azure roles, you must have the required permission:Microsoft.Authorization/roleAssignments/write, which is included in built-in roles such as:
- Owner
- User Access Administrator
Understanding Scope in Azure RBAC
In Azure Role-Based Access Control (RBAC), scope defines the set of resources for which access permissions apply. Scopes are structured hierarchically and permissions propagate from top to bottom in the following order:
- Management Group
- Subscription
- Resource Group
- Resource
Examples:
- To grant access to a specific storage account, set the scope at the individual resource level.
- To grant access across multiple storage accounts, assign the role at a broader scope such as the resource group or subscription level.
Best Practices
- Follow the principle of least privilege: grant only the minimum permissions required.
- Avoid assigning broad roles at higher scopes unless necessary.
- Limiting scope minimizes the potential impact if a security principal is compromised.
Inheritance Behavior:
- Resource Group Scope: Role assignments apply to all resources within that resource group.
- Subscription Scope: Role assignments are inherited by all resource groups and resources under the subscription.
Procedure: Assign Role at Resource Group Level
For this exercise, we will assign a role at the Resource Group scope.
Steps:
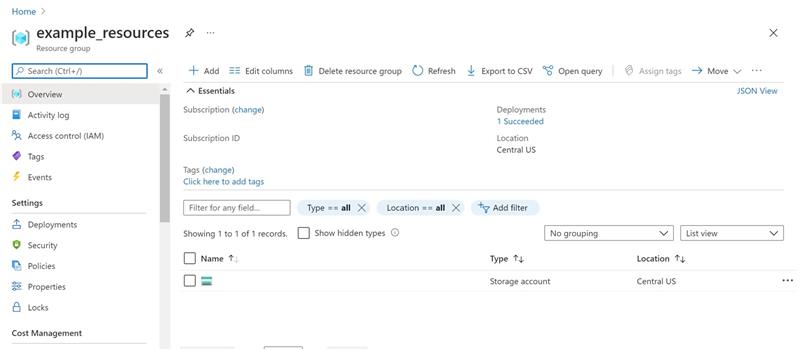
- Log in to the Azure Portal.
- In the search bar at the top, type the name of the Resource Group.
- Select the desired Resource Group from the search results.
(You can continue further steps like Access Control (IAM) → Add Role Assignment if needed.)
Opening the Role Assignments Pane
To add, remove, or modify role assignments in Azure, navigate to the Access Control (IAM) section—also referred to as Identity and Access Management.
This feature is available across multiple levels within the Azure Portal, including:
- Management Groups
- Subscriptions
- Resource Groups
- Individual Resources
The Access Control (IAM) blade serves as the central interface for managing RBAC permissions. From here, administrators can efficiently control and govern access to Azure resources based on organizational requirements.

Viewing and Creating Role Assignments
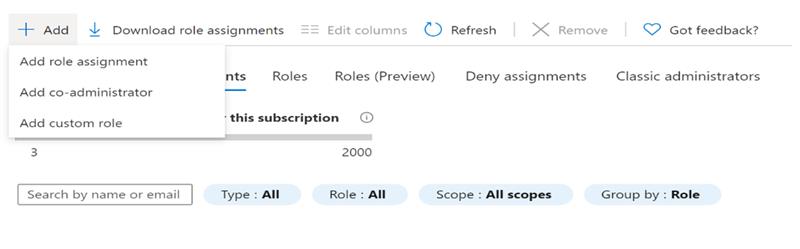
- Navigate to the Access Control (IAM) blade for the selected scope.
- Click on the Role Assignments tab to view all roles currently assigned at this level.
- To assign a new role, select Add → Add role assignment.
Note: If you do not have sufficient permissions (such as Owner or User Access Administrator), the Add role assignment option will appear disabled and cannot be used.
The Role Assignment pane opens, enabling you to select the appropriate role, assign it to a security principal, and define the scope of access.
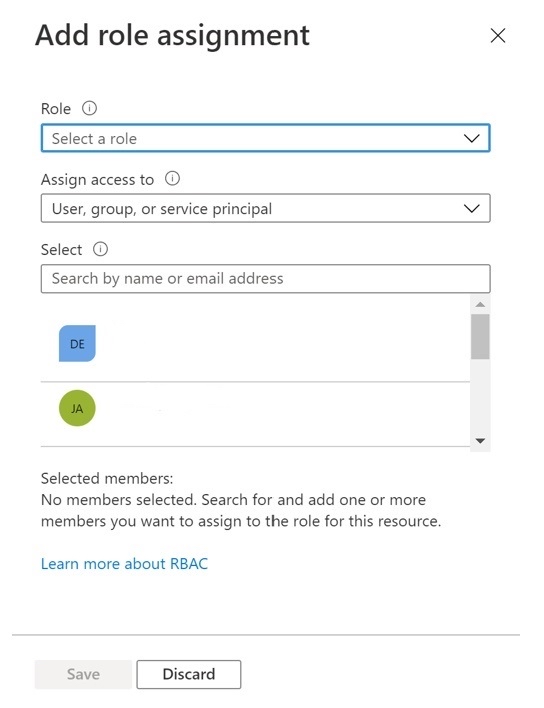
Select the Appropriate Role
- In the Role section, browse or use the search bar to locate the role you want to assign.
- Review the role description to ensure it aligns with the required permissions.
- Select the desired role and proceed.
Select the Security Principal (Who Needs Access)
- Under Assign access to, choose the appropriate type of security principal:
- User, Group, or Service Principal: Select this option to assign the role to individual users, groups, or applications (service principals).
- User-Assigned Managed Identity: Choose this for managed identities created and managed independently in Azure.
- System-Assigned Managed Identity: Select this option to assign the role to an Azure resource with an automatically managed identity.
- In the Select section:
- Search for the required security principal by entering its name, or
- Scroll through the list to locate and select it.
Assign the Role
- After configuring the role and selecting the principal, click Save to complete the assignment.
- The role assignment will be applied shortly (may take a few moments due to propagation).
- Navigate back to the Role Assignments tab to verify that the new role assignment appears in the list.
✅ Tip: Always validate the assigned role and scope to ensure compliance with the principle of least privilege and organizational security policies.
-For more info on Azure Built In roles refer here: Azure built-in roles – Azure RBAC | Microsoft Docs
-Refer here to understand scope of a user Role: Understand scope for Azure RBAC | Microsoft Docs
-For more information refer and methods refer the below docs: Classic subscription administrator roles, Azure roles, and Azure AD roles | Microsoft Docs | Assign Azure roles using Azure CLI – Azure RBAC | Microsoft Docs
Creating Custom Roles for Access Management
Azure RBAC allows organizations to define custom roles when built-in roles do not meet specific access requirements. Custom roles provide greater flexibility by enabling precise control over permissions and resource access.
Similar to built-in roles, custom roles can be assigned to:
- Users
- Groups
- Service Principals
These roles can be applied at different scopes, such as:
- Subscription level
- Resource Group level
Custom roles are stored within an Azure Active Directory (Azure AD) tenant and can be shared across multiple subscriptions within that directory. Each directory supports up to 5,000 custom roles.
Azure provides multiple methods to create custom roles, including:
- Azure Portal
- Azure PowerShell
- Azure CLI
- REST API
Steps to Create a Custom Role via Azure Portal
1. Define Required Permissions
Before creating a custom role:
- Identify the exact permissions needed for the role.
- Azure provides thousands of granular permissions that can be included.
- Reviewing existing built-in roles can help you understand and select appropriate permissions.
2. Choose a Creation Method
Azure offers three approaches to create a custom role:
- Clone an Existing Role (Recommended for efficiency)
- Start from Scratch
- Create from a JSON Definition
For this exercise, we will use the cloning method.
For the other approaches, refer to Microsoft documentation:
🔗 https://docs.microsoft.com/en-us/azure/role-based-access-control/custom-roles-portal#step-2-choose-how-to-start
Cloning an Existing Role
If an existing role closely matches your requirements but lacks certain permissions, you can clone and modify it instead of building a role from scratch.
Procedure:
- Log in to the Azure Portal.
- Navigate to the desired Subscription or Resource Group where the custom role will be assignable.
- Open Access Control (IAM).
From here, you can proceed to clone an existing role, customize its permissions, and define assignable scopes.
✅ Best Practice:
Cloning an existing role helps maintain consistency, reduces configuration effort, and minimizes the risk of misconfiguring permissions.

Creating and Managing a Custom Role in Azure (Refined Guide)
- Clone an Existing Role
- Navigate to the Roles tab to view built-in and custom roles.
- Search for the role you want to clone (e.g., Azure Kubernetes Service Cluster User Role).
- Click the ellipsis (…) → Clone.
- This opens the Custom Roles Editor with the Clone a role option.
- Basics Tab
- Provide:
- Custom Role Name (must be unique within the Azure AD tenant)
- Description
- Baseline Permissions (auto-populated based on the cloned role but can be modified)
- Provide:
- Permissions Tab
- Review or update permissions:
- Click Add permissions to open the selection pane.
- Search using keywords (e.g., Container Service).
- Select the relevant Resource Provider (e.g., Microsoft.ContainerService).
- Choose required permissions:
- Actions → Management plane
- DataActions → Data plane
- Click Add to include permissions.
- To remove permissions, click the delete (🗑) icon.
- Wildcard permissions (
*) allow broad access (e.g.,Microsoft.CostManagement/exports/*).- Wildcards must be added via the JSON tab.
- Use Exclude permissions to define:
NotActionsorNotDataActions- Effective permissions = (Allowed – Excluded)
- Review or update permissions:
- Assignable Scopes Tab
- Define where the role can be assigned:
- Typically Subscription or Resource Group
- Click Add assignable scopes → Select scope → Add
- Note:
- Root scope (
"/") and Management Groups are not supported.
- Root scope (
- Define where the role can be assigned:
- JSON Tab (Advanced)
- View and edit role definition in JSON format.
- Click Edit → Modify → Save
- Use this tab to:
- Add wildcard permissions
- Fine-tune role configuration
- Ensure JSON is properly formatted to avoid errors.
- Review + Create
- Click Create to finalize the custom role.
- Upon success, a confirmation message will appear.
- Post-Creation Actions
- View Role:
- Go to Access Control (IAM) → Filter by Custom Roles or search by name
- Edit Role:
- Click ellipsis (…) → Edit and modify as needed
- Delete Role:
- Remove all role assignments first
- Then delete the role
- View Role:
🔹 Summary
This process allows you to efficiently create a custom RBAC role by cloning and tailoring permissions, ensuring secure and precise access control within your Azure environment.
To create custom role via PowerShell: Tutorial: Create an Azure custom role with Azure PowerShell – Azure RBAC | Microsoft Docs
To create custom role via CLI: Tutorial: Create an Azure custom role with Azure CLI – Azure RBAC | Microsoft Docs
Thanks !